


It’s times like today that it’s hard to believe we are in the middle of Winter….
It’s times like today that it’s hard to believe we are in the middle of Winter….


At first, I thought I was starting to hear things. As the Auntie to two wonderful nephews, I’ve had many fun times over the years, but as they’ve gotten older, they naturally have friends and activities and lives of their own. To hear my elder nephew, who has perfected the art of retreat from family to the safe haven of other millenials, announce that he wanted to spend quality time with me was awesome. Then, to add that he wanted to learn how to cook before returning to school??? My reaction was something like this: http://www.youtube.com/watch?v=dOcYTOBA0CI&sns=me
I had a veritable cookbook of ideas ready, envisioning a whole project of planning and pricing menus, building a week of meals around a single food item, you name it. Then, of course, reality set in: ‘Auntie,’ said a somewhat amused Reality, ‘School takes too much time, and I have work this Summer.’ As if he should be prioritizing things like school, jobs and having a future. This is Cooking we were talking about!!! 😏
Cooking lessons occurred on two lovely Saturday afternoons last Summer, focusing on the most important staple in a college student’s life: pasta! Our more successful result was our family’s recipe for Pasta Puttanesca. It’s an amazingly versatile and irresistible sauce. Some of the ways I’ve used it:
– tossed with white and whole grain linguine
– combined with whole grain linguine and veggie noodles
– as a pizza base
– baked with chicken or as a topping for chicken or fish
– spread on toasted baguette slices and shredded Parmesan for a tasty spin on bruschetta
My nephew likes the sauce so much, that I made him the care package you see posted above. I packed supplies for at least six batches in a pasta bowl. He has never liked tomatoes, except in the way kids will do (pulverized and sweetened into bottled ketchup and BBQ sauce) so I put in some roasted red peppers instead, they work just as well.
This is the recipe my family has enjoyed for years, and I hope it can bring your family some of the fun memories it’s done for us. ❤️
Ingredients:
3 tablespoons olive oil
1 small container anchovy fillets
1 teaspoon crushed red pepper flakes (more or less depending on your taste)
3 cloves garlic
Salt and Pepper to taste
3-4 cups chopped tomatoes OR 3-4 cups chopped roasted red peppers
2 tablespoons capers
20 kalamata olives, pitted and chopped
2 pounds pasta, or 1 pound pasta and 2-3 cups veggie noodles
Steps:
1. Place oil in large pan with anchovies and warm at medium heat, using a wooden spoon to crush the anchovies into paste.
2. Add in garlic, salt, pepper and red pepper, continue cooking.
(At this stage, you have a traditional Italian Aioli. You can stop here and toss this mixture into cooked pasta or steamed veggie noodles.)
3. If continuing from Aioli to Puttanesca, add in the capers, chopped olives and tomatoes/ roasted red peppers. Stir and cook until bubbling.
4. Taste and adjust seasonings, then toss into desired pasta.


Like many people nowadays, I’m trying to cut back on the amount of sugar I eat and drink, but at the holidays like to enjoy and share traditional treats. And never have four sugars worked together in such lovely harmony to that end!
These marshmallows are so light and fluffy, it’s hard to believe that there’s so much sugar involved, but OH YES, there’s four: corn syrup, granulated sugars (I used 2/3 white and 1/3 brown sugar when I realized I was short some of the white sugar), and confectioner’s sugar.
While I decorated these marshmallows inspired by the picture for this recipe:
http://www.marthastewart.com/355781/candy-cane-marshmallows
This is the standby recipe I’ve been making at the holidays for the past 15 years:
http://www.marthastewart.com/333974/homemade-marshmallows
I’m sure the other is nice too, but I’ve had great results from her original recipe. Additionally, the version I use doesn’t call for egg whites, which as a protein has an impact on the shelf life of the product.
Speaking of which, due to the lack of preservatives (cue laughter given this is primarily sugar in a fluffier form) the marshmallows need to be kept in an airtight container in a cool and dark place. They also won’t work well for crisped rice treats, unfortunately, unless the treats are getting eaten right away. You can use the freezer for the marshmallows. They won’t freeze entirely, their texture remains somewhat spongy.
Each batch makes upward of 30-40 marshmallows, depending on the size you want. You can cut them into shapes with a medium or large-sized cookie cutter too, and save all the scraps for your cocoa ☺️
If you like marshmallows, in s’mores or cocoa, or just as a snack, these are worth a try: enjoy!


One of the best parts of where I live is the lake within driving distance. Whenever I need to clear my head, I take a long walk around the lake and marvel at the ever-changing and often startling beauty this little lake provides. I took these pictures in early winter, before the weather started to get too cold.
~~Images copyright 2015 by Lauren Bradford (aka The Food Puzzler)~~

INGREDIENTS
2 cups oats
1 tbsp PB powder (plus 2 tbsp for topping)
1 tsp cinnamon
Pinch salt
3 ripened bananas, puréed
1/2 cup applesauce
2 tsp vanilla
1/2 diced baking apple, like Cortland
1/2 cup diced walnuts (optional)
INSTRUCTIONS
Process oats, PB powder, cinnamon and salt into a food processor and pulse until you get a flour texture, then place in a large bowl. Fold in the diced apple and add the walnuts, if desired.
Place the banana, applesauce and vanilla into the food processor and blend until smooth.
Add this mixture to the dry ingredients and mix completely. Since there is no gluten, don’t worry about over mixing as the product will not toughen.
Form into a rectangle on top of a parchment-lined cookie sheet pan. Optional: top with slices of apple.
Bake in 350 degree oven until toothpick comes out clean, about 10-15 minutes. Cool and cut into pieces. If desired, mix 2 tbsp PB powder and enough water to make it easy to drizzle on top.
Enjoy!
~~Copyright 2015 by Lauren Bradford (aka The Food Puzzler)~~
Pumpkin Muffins
INGREDIENTS
3 cups oats
3 tablespoons pumpkin pie spice (see NOTES)
Pinch salt
Chopped walnuts (optional)
2 tablespoons vanilla
1 1/2 cups puréed pumpkin
1/4 cup whole cranberries, rinsed
3/4 cup cannellini beans
8 dates, pitted and soaked in warm water to soften
1/2 cup fresh brewed black, chai or pumpkin spiced tea
INSTRUCTIONS
Process oats, salt and spice into a food processor and pulse until you get a flour texture, then place in a large bowl. Add the walnuts to dry ingredients, if desired.
Place the remaining ingredients into the food processor and blend until smooth, with small specks of cranberry.
Add this mixture to the dry ingredients and mix completely. Since there is no gluten, don’t worry about over mixing as the product will not toughen.
Place in muffin cups (makes 18) and fill most of the way to the top. Optional: top with more fresh cranberries and/or walnuts.
Bake in 350 degree oven until toothpick comes out clean, about 10-15 minutes.
~~Copyright 2015 by Lauren Bradford (aka The Food Puzzler)~~
NOTES: Make your own pumpkin spice blend if you have the spices on hand: 2 tablespoons cinnamon, 1 teaspoon each ground ginger and ground nutmeg and 1/2 teaspoon each ground cardamom and clove. Or add your own preferred pumpkin-friendly spices. 😊


INGREDIENTS
2 1/2 cups oats
3 tablespoons pumpkin spices (see NOTES)
Pinch salt
Nuts (optional).
1 cup puréed pumpkin
1/2 cup natural applesauce
2 tbsp vanilla
1/4 cup whole cranberries
INSTRUCTIONS
Process oats, salt and spice into a food processor and pulse until you get a flour texture, then place in a large bowl. Add the walnuts to dry ingredients, if desired.
Place the remaining ingredients into the food processor and blend until smooth, with small specks of cranberry.
Add this mixture to the dry ingredients and mix completely. Since there is no gluten, don’t worry about over mixing as the product will not toughen.
Form into a rectangle on top of a parchment-lined cookie sheet pan. Optional: top with more fresh cranberries and/or walnuts.
Bake in 350 degree oven until toothpick comes out clean, about 10-15 minutes. Cool and cut into pieces. Enjoy!
~~Copyright 2015 by Lauren Bradford (aka The Food Puzzler)~~
NOTES: Make your own pumpkin spice blend if you have the spices on hand: 2 tablespoons cinnamon, 1 teaspoon each ground ginger and ground nutmeg and 1/2 teaspoon each ground cardamom and clove. Or add your own preferred pumpkin-friendly spices. 😊

Recently, I realized that while I still can’t eat chocolate, foods containing only cocoa powder were fine, opening up a whole new world of tastes! Finally being able to enjoy hot cocoa with marshmallows, chocolate cookies, chili and mole sauces…and chocolate pudding!
Since I made this discovery close to Halloween, I had lots of canned pumpkin with which to play, and play I did. In order to create this treat:
~ place 6 ounces canned pumpkin into a small pan and warm through.
~ add in 2 teaspoons unsweetened cocoa and stir to combine.
~ taste and adjust sweetener of choice accordingly (I used molasses).
~ garnish with marshmallows and chocolate chips, if desired.
Enjoy!
NOTE: This thickens quickly due to the pumpkin, so add a teaspoon or two of water or milk to the pan to adjust thickness if needed.
Copyright 2015 by Lauren Bradford (aka The Food Puzzler)

Ever since I started learning how to cook, I wanted to come up with the ‘perfect veggie burger,’ something that could be eaten like a meat burger, but without the hockey puck texture of some of those meatless burgers one finds in the grocery’s freezer section.
The first two recipes are the product of many years and many (Sorry, Mom) experiments, and work well on their own really well. I’ve used them as part of breakfast sandwiches in an English muffin with egg and cheese, on top of spaghetti squash with sauce, or salad greens with some hummus and salsa in place of dressing. The final recipe is a modification of one from the wonderful site My New Roots (http://www.mynewroots.org/site/).
Together, they make an amazing burger!
Chia-Carrot burgers
Copyright 2015 by Lauren Bradford (aka The Food Puzzler)
– 4 cups shredded carrots
– 1/2 cup chia seeds
– 1 can beans, smushed
– 1 cup rice, cooked
– 1/4 cup spelt
– 1/4 cup pulsed onion
– 1 egg
– salt pepper onion/garlic powder to taste
Combine and let sit for 10-15 minutes before forming into patties. Bake at 325 degrees for about 25 minutes, until the patty is cooked through and at 165 degrees internal temperature.
Enchilada Mushroom Burgers
Copyright 2015 by Lauren Bradford (aka The Food Puzzler)
– 8 oz shrooms sautéed with 1/2 medium onion, water and 1/2 cup enchilada spices
– 1/4 cup flaxseed
– 1 can beans, smushed
– 1 cup rice, cooked
– 1/4 cup spelt
– salt pepper onion/garlic powder to taste
Combine and let sit for 10-15 minutes before forming into patties. Bake at 325 degrees for about 25 minutes, until the patty is cooked through. This patty doesn’t contain eggs so it doesn’t need a temperature check smile emoticon
The final part was the ‘bun,’ and I found the perfect inspiration at My New Roots: http://www.mynewroots.org/site/2015/09/cauliflower-buns-bagels/ (note, in my modification, I didn’t use the psyllium husk or nutritional yeast, mainly because they aren’t easily available around here).
Cauliflower-Walnut ‘Buns’
Adapted 2015 by Lauren Bradford from lovely My New Roots recipe
1 head cauliflower, pulsed small
1 cup walnuts, small pieces
2 eggs
1/2 cup whole flaxseed
1/4 cup spelt or flour of choice
1 tsp each salt, black pepper, red pepper, garlic powder, onion powder, and parsley
Combine all ingredients and form into 12 patties.
Bake at 350 degrees for 25 minutes, rotating the pans halfway through the baking process. They’ll get nice and golden on top.
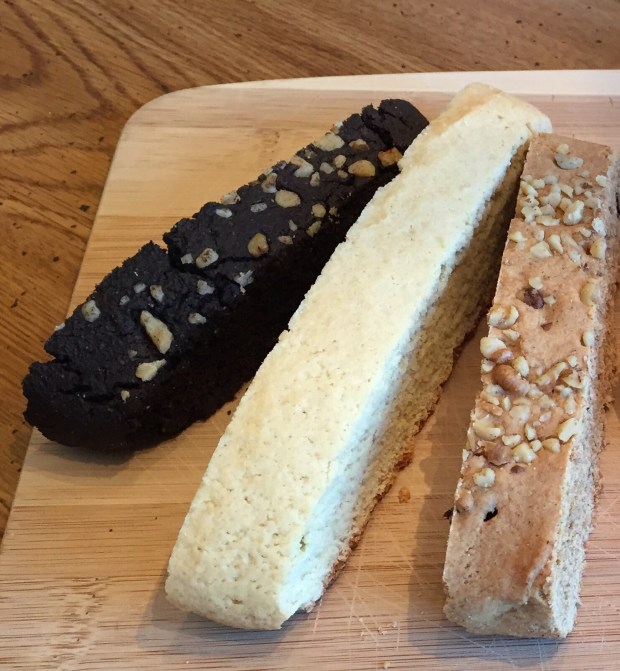 This is literally my first-ever recipe, from over 20 years ago. It’s easy to make and adapts well to variations, so it’s my go-to when I need to provide a baked goody or to include in a gift basket. Or to eat, which is often what happens to half the first batch. 😊
I was a complete novice in the kitchen at this point, having foolishly refused to learn anything from my Mom for years. I’m fortunate that I finally came to my senses, and this was the recipe that started me on my culinary path.
At the time, I was working in my first office job. Nearing Christmas, I was happily surprised by seeing some gifts left on my desk. Then, of course, I started to panic. I didn’t have the money to reciprocate, but I really liked my coworkers and wanted to share in the season.
I decided to make cookies. Who doesn’t like a little treat at the holidays? So I went to a standby chocolate biscotti recipe from my Mom. I figured it was a safe bet, since how could I go wrong with a cookie that gets baked twice? 😉
Cue the problems:
~ I wasn’t a baker, unless slicing and baking logs of that refrigerated cookie dough counts.
~ I am allergic to chocolate, and didn’t have a taste for it (even just cocoa). But being a kitchen novice, I didn’t understand concepts like ‘wet’ and ‘dry’ ingredients and how they affect things like cookies.
I just took out the cocoa and didn’t add flour to compensate.
Despite this, Mom agreed (warily) to be my taste-tester. The wonderful thing, though, is that the final product worked! The end result didn’t have the same hard texture of traditional biscotti, though, and Mom declared that they were more like a squishy biscotti.
The Bisquishie(c) was born!
INGREDIENTS: Basic Vanilla Biscotti
copyright 1994 by Lauren Bradford (aka The Food Puzzler)
1 cup sugar
2/3 cup butter, softened
3 large eggs, beaten
1 tbsp vanilla
1/2 tsp salt
2 tsp baking powder
3 cups flour of choice (see NOTES)
Optional adds: chocolate chips, toasted nuts, sprinkles.
Optional toppings: melted chocolate or candy melt or confectioner’s sugar glaze, same with mini choc chips, toasted nuts, sprinkles.
INSTRUCTIONS
1. Preheat your oven to 350 degrees.
2. In a large bowl, add in the butter and sugar. With a hand mixer, beat on low speed to get the butter and sugar incorporated and smooth.
3. Crack your eggs into a bowl and beat, then add to the butter-sugar mixture and incorporate.
4. Add in the vanilla, salt, and baking powder.
5. Add in the flour and mix until thoroughly combined.
6. If you are adding in optional ingredients, fold them in by hand or they’ll break up and bleed into the batter. (The end result still tastes good, if you prefer not to hand-mix here.)
7. Line a cookie sheet pan with parchment paper (optional if using a non-stick pan, but handy for product release and pan cleanup.) The dough is sticky, so with slightly wet hands, form the dough into one or two logs of 1 inch thickness.
8. Bake for approximately 20-25 minutes, rotating the pan halfway through this time to ensure even baking. They’re ready to come out when an inserted knife or toothpick comes out clean.
9. Remove from the oven and cool at least 15 minutes, then slice to desired thickness. You should get 12-15 from a single log or twice that of smaller pieces from two logs.
10. Lay the slices cut-side down (either side is fine) and return to the oven for another 5 minutes, then flip to the other cut side and return to the oven for another 5 minutes.
11. If topping, let the bisquishies cool completely first.
Bisquishies store well in an airtight container and out of direct sunlight for up to a week, or store for months in same containment in a freezer.
For those who aren’t partial to vanilla, here’s my recipe alterations for cocoa-nut and peanut butter.
INGREDIENTS: Cocoa-Nut
You use the same ingredients as above, with one change: remove 1/2 cup flour and replace with 1/2 cup cocoa powder of choice.
I recommend an extra step as well, since cocoa powder seems to love flying everywhere. Add it to the bowl after creaming the liquids, salt and baking powder together–and stir by hand–then add in the flour.
INGREDIENTS: Peanut Butter
After adding in the flour, add in between 1/2 and 1 cup peanut butter powder, starting with a 1/2 cup and adding more until the dough has a strong but still workable consistency. Top with chopped or sliced nut of choice and pat down into the dough. This adds nice crunch and also alerts people to the presence of nuts in the batter.
For a PB&J, stir in dehydrated fruits. Don’t laugh (ok, laugh at will): I get these in the baby food section of the grocery store. Other varieties usually have lots of added sugar, which will throw off the texture and taste.
For a spin on that favorite of peanut butter-chocolate treats, stir in 1/2 cup chocolate chips or melt the chips and drizzle over the tops of cooled bisquishies.
NOTES:
~ Appreciating that some people require gluten-free flours, I have done a little experimenting over time. 😊
Certain flours will work well, others might not meet your needs. In addition to traditional wheat flour and spelt (a non-hybrid relative of wheat), I have had luck with all-purpose gluten-free flour. Soy flour works, but only if you’re making chocolate variations. Cocoa masks the cheesy smell and taste Soy flour has when cooked.
