Savory Crescents with Brie, Apples and Date-Berry Sauce

IMG_1613

These crescents are a great way to turn leftovers into a light meal or snack. Homemade Date-Berry sauce gives these Apple-Brie bites a rich and mildly tart bite. The recipe give you lots of leftover date-cranberry sauce to enjoy on top of cooked chicken, toast, or over creamy yogurt.

~~~~~~~~~~~~~~~~~~~~~~~~~~~~~~~
Savory Crescents with Brie, Apples and Date-Berry Sauce
Copyright 2017 by Lauren Bradford (aka The Food Puzzler)
~~~~~~~~~~~~~~~~~~~~~~~~~~~~~~~

Prep time: 1 hour
Baking time: approximately 10 minutes
Makes: 8 Crescents plus 2 cups date-Berry sauce

~~~~~~~~~~~~
INGREDIENTS:
~~~~~~~~~~~~
30 pieces Dates, pitted and chopped small
12 ounces Whole cranberries (1 bag)
1/2 cup Brewed black, chai, or pumpkin spiced tea
1 Cinnamon stick
2 Star Anise
1 tablespoon Vanilla extract
1 Tube Crescent rolls of choice
8 Slices Brie
1/4 cup Blueberries
1 Granny Smith apple, sliced thin
~~~~~~
STEPS:
~~~~~~
Bring the cranberries, dates, vanilla, tea and spices to a boil, then simmer until the cranberries have burst and the dates are softened, and the mixture thickens slightly.Remove the cinnamon and star anise, and cool. Then, pulse the mixture in a food processor.Next, line a sheet pan with parchment, pop the crescent roll tube and lay out the pieces onto the sheet pan.Lay one to two slices of apple on each crescent, depending on the thickness. Divide the Brie and blueberries among the 8 crescent pieces. Place 2 tablespoons of the date-cranberry mixture into each crescent, then roll each crescent. I usually roast the rest of the apple slices for a snack, they usually fit on the same sheet pan.Bake at 350 degrees for about 10 minutes, rotate once and watch carefully as you might need to add or decrease the time to melt the Brie and get a golden color on the rolls. Enjoy!


Meet My Monster (Sandwich and Dip, That Is 😉)

I love the savory, creamy goodness of a spinach and artichoke dip, and wanted to find a way to make it healthier so I am able to indulge more often 😃 This recipe’s creaminess comes from puréed beans/hummus, with some Parmesan cheese to bring that familiar salty, savory bite.

This is a really versatile dip! Serve with firm veggies like carrots and peppers sliced into planks and/or crackers of choice. Top baked chicken or fish — even bake the protein nestled into the dip for more savory goodness! Toss with cooked pasta or rice for a yummy side dish. Use as a base for pizza or calzone filling. Spread on your favorite bread when making your favorite sandwich. Or, as I show below, turn it into your new favorite sandwich!

~~~~~~~~~~~~~~~~~~~~~~~~~~~~~~~
Meet My Monster (Sandwich and Dip, That Is 😉)
Copyright 2017 by Lauren Bradford
(aka The Food Puzzler)
~~~~~~~~~~~~~~~~~~~~~~~~~~~~~~~

Prep time: 15 minutes
Cook time: approximately 1 hour (either recipe)
Serves: Monster Patties (5) or Appetizer Dip (10)

~~~~~~~~~~~~
INGREDIENTS:
~~~~~~~~~~~~

1# bag chopped frozen spinach (no need to thaw or squeeze out excess liquid!)
2 15-oz cans artichoke hearts, chopped fine
2 cups puréed white beans or hummus (plain, red pepper or garlic)
1 cup shaved or grated Parmesan cheese
1 medium red onion, diced small
2 tablespoons each garlic and onion powder
1 teaspoon each salt and black pepper
1 tablespoon oil of choice
4 tablespoons flax seeds, ground and reserved

~~~~~~~~~~~~
INGREDIENTS:
~~~~~~~~~~~~

1. Coat the bottom of a medium-sized baking dish with the tablespoon of oil and set aside.

2. In a very large bowl, thoroughly combine all but the ground flax seeds.

3. Transfer all but 2 cups of the mixture into the baking dish, cover with a piece of parchment and then foil. There are plenty of options here:

– If you want to make the dip immediately, heat your oven to 350 degrees and bake until hot, about 30-40 minutes, stirring halfway through.

– If you are making it one day ahead, place in the fridge. The next day, leave it on your counter for half an hour prior to heating your oven and baking at 350 degrees for 45 minutes, stirring halfway through.

– If you freeze the dish for later use, place it in your fridge the day before baking to thaw it out a bit, and leave it on your counter for an hour prior to heating your oven and baking at 350 degrees for 45 minutes to an hour, stirring at 30 minutes.

4. Meanwhile, place the reserved ground flax seeds and the remaining 2 cups of mixture together in a microwave-safe bowl. Combine, cover with parchment and warm through at the defrost setting for 5-10 minutes, and then let rest for 5 minutes so the flax can work its magic.

5. Divide into five equal portions and form into patties. (In the picture above, I made extras into bite-size balls as well as patties, fun for dipping!) Place on a parchment-lined sheet pan. Here, you can also bake immediately or freeze for later use (or bake, cool and freeze for quick sandwiches during the work week). If baking immediately, place in a 300 degree oven for 30 minutes. Then, flip over gently, place back in the oven, turn off the heat and let rest for 15 minutes.

Assemble your sandwiches with whatever toppings you like, these savory patties are very flexible! Here, I use roasted red peppers, tomato slices, fresh greens and a fried egg. I also eat them with extra cheese melted on top, with a side of greens.

Enjoy!

Strawberry-Banana & Chocolate PB Breakfast Biscotti

img_1594

One Package 5-Grain Cereal
One Container Unsweetened Applesauce
One Bunch Ripe Bananas
Limitless Possibilities

I have so many weird allergies at the moment, and we aren’t sure yet what causes reactions, that I generally figure it out by trial and error. Unfortunately, most of my reactions stem from food, so I’m always trying to find ways to make things I can eat — and want to eat — which recapture foods I love and miss. If they last well in the fridge and freezer, and boast nutrients, it’s a bonus!

These breakfast biscotti are easy to make and customizable to any tastes. Chocolate chips, nuts, fruits; the possibilities are endless! The one thing I recommend is not adding fresh fruits to the batter, as it can make the resulting biscotti spongy. Fresh fruits I put on top prior to baking, and smush them in a bit. Freeze-dried fruits can be mixed into the batter just like nuts or chocolate chips.

~~~~~~~~~~~~~~~~~~~~~~~~~~~~~~~
Strawberry-Banana and Chocolate-Peanut Butter Breakfast Biscotti
Copyright 2017 by Lauren Bradford (aka The Food Puzzler)
~~~~~~~~~~~~~~~~~~~~~~~~~~~~~~~

Prep time: 15 minutes
Baking time: approximately 30 minutes
Makes: 24 of each flavor

~~~~~~~~~~~~
INGREDIENTS:
~~~~~~~~~~~~

~~~~~~~~~~~~~~~~~~~~~~~~~~~~~~
Strawberry-Banana Breakfast Biscotti
~~~~~~~~~~~~~~~~~~~~~~~~~~~~~~

1 cup applesauce
3 ripe bananas, mashed
2 teaspoons vanilla extract
2 cups flour from processing oats or 5-grain cereal in food processor or spice grinder
1 teaspoon baking soda
3/4 teaspoon baking powder
3/4 teaspoon salt
1/2 teaspoon cinnamon
1/4 cup flax seeds
1/4 cup chia seeds
10-12 strawberries, sliced and roasted for 10 minutes, for topping

~~~~~~~~~~~~~~~~~~~~~~~~~~~~~~~~~~
Chocolate Peanut Butter Breakfast Biscotti
~~~~~~~~~~~~~~~~~~~~~~~~~~~~~~~~~~

1 1/2 cups applesauce
3 ripe bananas, mashed
1 tablespoon vanilla extract
2 1/2 cups flour from processing oats or 5-grain cereal in food processor or spice grinder
1/3 cup cocoa powder
1/3 cup PB powder
1 teaspoon cinnamon
1 teaspoon baking soda
1 teaspoon baking powder
1 teaspoon salt
1/2 cup peanuts, divided

~~~~~~
STEPS:
~~~~~~

1. Preheat the oven to 350 degrees. Line a sheet pan with parchment and lay out the slices of strawberries. Place them in the oven as it warms up, and leave them in until you see juices start running out. Remove and cool.

2. Have two large bowls on hand. Into each bowl, mash 3 bananas. Then, mix in the measured applesauce and vanilla.

3. Place all of the dry ingredients except for the oat/grain flour into their respective bowls and mix completely.

4. In the Strawberry-Banana bowl, mix in the seeds. In the Chocolate PB bowl, mix in half of the peanuts.

5. Finally, mix in the amounts of flour into their respective bowls and mix completely. This is a thick dough, so I recommend mixing by hand. Let bowls rest for 10 minutes.

6. On two parchment-lined sheet pans, form the dough into rectangles about 1/2 inch thick. When you form the Chocolate PB dough, wetting your hands makes it easier to form the dough.

7. Press the strawberries on top of its dough, and the rest of the peanuts on top of its dough, and place them in the oven.

8. Bake for 30 minutes, rotating them halfway through the baking time.

9. Rest for 10 minutes, then make 24 slices out of each dough, being careful of the steam that comes up.

10. On freshly-parchment-lined sheet pans, arrange the slices cut-side down and place in the oven. Turn the oven off and let the breakfast biscotti rest for 5 minutes more.

11. Remove from the oven and serve immediately, or cool and store in the freezer in an airtight container.

Dreamy Vegan Mint and Mocha Truffles

img_1579

I grew up allergic to chocolate. While I’ve had brief windows when I could eat chocolate without ill effects, as can sometimes be the nature of a 40-plus year allergy, I’ve returned to being seriously allergic to chocolate.

The thing is, I really love chocolate, especially creamy, dreamy truffles, so I am always looking for ways to enjoy the flavors.

These truffles are really easy to assemble, the dates adding an incredible richness that pairs well with either the vanilla or the mint. I’ve made them in both bar form and these bites, but I particularly like the bites for having a quick snack or sharing with friends.

Enjoy!

Dreamy Vegan Mint and Mocha Truffles
Copyright 2016 Lauren Bradford (aka The Food Puzzler)

Prep time: 1 hour
Servings: approximately 15 for each truffle

INGREDIENTS

– 30 ounces dates, pitted and stems removed (NOTE: If purchasing pitted dates, cut each in half to ensure that there are no remaining pits or stems. In each 10 ounce container, I usually get 10 stems and 1-2 pits.)
– 1/4 teaspoon salt

Mocha adds:
– 1/2 cup unsweetened cocoa powder, plus more for rolling
– 1 packet (teaspoon) instant coffee (I used Starbucks decaf Via)
– 1/4 cup brewed decaf coffee, cold
– 2 teaspoons vanilla extract

Mint adds:
– 1/2 cup unsweetened cocoa powder
– 1-3 teaspoons peppermint or mint extract, to taste
– mint leaves for garnish, optional

SPECIAL EQUIPMENT:

– food processor
– food safe plastic gloves (optional, but it keeps you from being covered in cocoa)
– 2 parchment-covered sheet pans

STEPS

1. In a food processor, pulse half of the dates and salt until the mixture balls up like a dough. Place in a bowl, then pulse the remaining dates and salt, and place in a separate bowl.

2. In the first bowl, add in the remaining Mocha ingredients, put on food safe gloves and mix thoroughly by hand. Taste, and adjust vanilla to taste if necessary.

3. In the second bowl, add in the remaining Mint ingredients, put on food safe gloves and mix thoroughly by hand. Taste, and adjust mint to taste if necessary.

4. Place some cocoa powder on the first parchment-covered sheet pan. From the Mocha dough, portion out 15 pieces. Roll each into a ball, then roll in the cocoa powder. Set aside.

5. Portion out 15 pieces from the Mint dough, roll into balls and place on the second sheet pan. If desired, gently press mint leaves on top for garnish.

Serve immediately, or place in airtight containers. Will keep one week in the refrigerator, or three months in the freezer.

Capri-Style Limoncello

img_1533

img_1535
Mom meditating in the Capri Sun.

Years ago, I was fortunate enough to take a trip to Italy with my Mom. One of the places we visited was the Isle of Capri. It’s a stunning place: bright and sunny, with flavors equally reflecting the vibrant location.

I tried Limoncello there for the first time, and loved the delicate lemon flavor. When we got home, I started working out how to make it. I found that the secret is in the simple syrup used to sweeten the vodka, enhancing it by adding the juice from the lemons whose peels infuse the vodka.

The bonus is, if you have extra lemon simple syrup, add it to tea, still or sparkling water for another refreshing beverage.

Enjoy!

~~~~~~~~~~~~~~~~~~~~~~~~~~~~~~~
Capri-Style Limoncello
Copyright 2009 by Lauren Bradford
(aka The Food Puzzler)
~~~~~~~~~~~~~~~~~~~~~~~~~~~~~~~

Prep time: 10 minutes
Processing time: 3 days (mostly inactive)
Makes: Approximately 200 Liters

~~~~~~~~~~~~
INGREDIENTS:
~~~~~~~~~~~~

1-1.75 liter bottle vodka of choice
3 Lemons
1 cup sugar of choice
Water as needed

~~~~~~
STEPS:
~~~~~~

1. Wash the lemons and carefully remove the peel so that you don’t get any of the white pith, as that will make the Limoncello bitter tasting.

2. Place the peel into the bottle of vodka and cap it, then place the vodka in your fridge for 3 days.

3. Next, juice the three lemons and strain out the seeds, and place in a measuring cup. Top off the measuring cup with water so it equals one full cup of liquid.

For the next step, have a bowl of ice water next to you at the stove and be sure that you have at least 30 minutes where you can focus on the stove. Sugar, when heated, can boil over quickly.

4. Place the liquid in a medium-size pan with the one cup of sugar, and warm on medium heat until the sugar dissolves, stirring frequently. Then, reduce heat to low and continue warming until the mixture thickens slightly into a lemon simple syrup, about 20 minutes. Then, cool completely and store in an airtight container in your fridge.

5. After the 3 days have passed, strain the vodka into a pitcher with room for the lemon simple syrup as well. Start by adding half of the simple syrup to the pitcher, stir and taste. Continue adding the lemon simple syrup to the pitcher until the taste is to your preference.

Serve chilled; portion size is one ounce.

To store, keep refrigerated in a closed container.

Refreshing Healthy Mint Smoothie

img_1532

Watching the snow piling up outside, relieved we were home safe as visibility went down to 0 with hours of snow to go, I started thinking about ways to make treats with what I had home. Loving mint, especially at this time of year, I’ve been curious about healthy spins on green shakes and smoothies.

I made my own almond milk, because going anywhere near a market once the snow levels were announced was pretty much impossible, but any milk of choice certainly will do! If you make your own nut milk, and are using a 55-year-old blender like me, a fine mesh strainer or cheesecloth will allow you to separate the nut ‘meats’ from the ‘milk.’ They can be reserved for mixing into hot breakfast cereals. 🙂

~~~~~~~~~~~~~~~~~~~~~~~~~~~~~~~
Refreshing Healthy Mint Smoothie
Copyright 2017 by Lauren Bradford
(aka The Food Puzzler)
~~~~~~~~~~~~~~~~~~~~~~~~~~~~~~~

Prep time: Overnight (soaking the almonds)
Processing time: 15 minutes
Serves: 4

~~~~~~~~~~~~
INGREDIENTS:
~~~~~~~~~~~~

1 10-oz bag almonds, soaked in water overnight
1 mint tea bag
1 oz mint extract
10 leaves fresh, washed mint
2 cups fresh, washed baby spinach
Water as needed

~~~~~~
STEPS:
~~~~~~

1. In a container with a tight lid, place the almonds and enough water to cover, and put the container in the fridge overnight. Make a strong cup of mint tea and leave the bag in the cup while it cools, then remove the bag, cover and store the cooled tea in the fridge overnight.

2. The next day, drain and rinse the almonds, add to your blender with fresh water to cover and blend until as smooth as possible. Strain the ‘milk’ into a separate container and reserve any remaining ‘nut meats.’

3. Add the extract, mint leaves, tea, spinach and ‘milk’ into the blender and purée, adding cold water if necessary.

4. Taste and adjust to your desired level of mintiness.

Enjoy!

Vegan Pad Thai-Inspired Noodles

img_1542

‘I think I’m going to need a bigger bowl.’

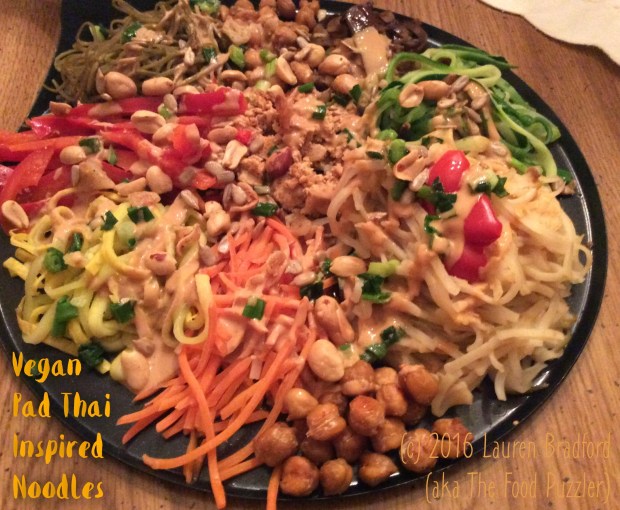
Somewhere along the halfway cooking point, I realized I’d overdone things as usual, and what I intended as a little rainy day snack had turned into a meal fit for a party. With two types of noodles, 4 cups of chopped and shredded vegetables, multiple entries from the bean family, as well as peanuts two ways, I suspect this dish will supply me with lunch and dinner for a week, with plenty packed in the freezer for later.

This dish starts as Vegan, but easily lends itself to the cooked proteins and scrambled eggs associated with more traditional Pad Thai dishes. You can make this completely gluten-free using Tamari in place of the Soy Sauce. I love the peanuts in this dish, but for those with nut allergies, toasted and ground sunflower or sesame seeds bring a similar richness to the dish.

~~~~~~~~~~~~~~~~~~~~~~~~~~~~~~~
Vegan Pad Thai-Inspired Noodles
Copyright 2016 by Lauren Bradford
(aka The Food Puzzler)
~~~~~~~~~~~~~~~~~~~~~~~~~~~~~~~

Prep time: 15 minutes
Cook time: 30 minutes
Serves: 15-20 people

~~~~~~~~~~~~
INGREDIENTS:
~~~~~~~~~~~~

15 ounce can chickpeas, drained and rinsed

5 scallions, each rinsed, ends trimmed and cut into three pieces

1 cup diced butternut squash

1 package edamame noodles (I used Explore Cuisine’s organic brand, available at Market Basket in the pasta aisle)

1 package rice noodles

4 cups water

2 tbsp PB powder plus 1 tbsp peanut butter

3-5 cloves of garlic depending on size, sliced

3 tbsp peanuts plus more for garnish

Zest and juice of 1 lime

1 package tofu of choice, water pressed out and chopped into small dice

1 package (about 3 cups) shredded carrots

1 each zucchini and summer squash, spiralized

1 package (about 4 cups) bean sprouts
1 teaspoon red pepper flakes
5 tablespoons Sesame oil
4 tablespoons soy sauce
2 tbsp garlic powder (half for the pasta water)
1 tbsp salt (half for the pasta water)

~~~~~~
STEPS:
~~~~~~

1. Preheat the oven to 350 degrees, and line two sheet pans with parchment paper.

2. Rinse and drain the chickpeas and scallions, trim and cut the scallions into three pieces each, and place on one sheet pan.

3. If you purchase pre-cut butternut squash, cut into even pieces if needed and place on the other sheet pan. If you have a whole squash, cut in half width-wise and then length-wise, and remove the seeds. Peel one of the quarter pieces and dice into relatively even size. The pieces and quarters will cook fine for these purposes all together on one sheet pan.

4. Coat the items on both pans in 1 tablespoon of the oil, enough just to coat, and sprinkle with 1 teaspoon each of the salt and garlic powder.

5. Roast at 350 degrees, with the chickpeas and scallions being done in about 15 minutes and the squash in about 25 minutes. Reserve on the sheet pans, you can even keep them both in the oven with the oven off.

6. While these items roast, in a large pot bring the water to a boil with 1 tablespoon each of the salt and garlic powder. Cook the edamame noodles to package directions but don’t drain, just remove the noodles, place on your serving platter and toss with 1 teaspoon each of the soy sauce and sesame oil to prevent sticking.

7. Then, place 2 teaspoons of sesame oil, 2 teaspoons of soy sauce, and the two tablespoons of peanut butter powder in the pasta water and stir to combine. Place the rice noodles in this mixture, pressing gently to submerge the noodles. Cover, turn off the heat, and let the noodles sit.

8. After about 5 minutes, the noodles should be done and most of the pasta liquid will be absorbed. Test the noodles for doneness, then stir to combine everything fully. Transfer the rice noodles and all remaining liquid (it will be absorbed by the still-warm pasta) to the platter with the edamame noodles and combine.

9. Scrape down the sides of this same large pan, so the rice starch doesn’t burn, and now place in it the remaining 3 tablespoons of the sesame oil, garlic, lime zest, and peanuts, remaining salt and the red pepper flakes. Cook on a medium-low heat until the garlic is softened, about 5 minutes, stirring frequently to prevent burning.

10. Add the tofu cubes, 3 tablespoons of soy sauce and the lime juice, and continue cooking until the tofu is warmed through. Then add the zucchini, summer squash, carrots and sprouts, and with two large spoons begin tossing to cook them evenly, about 10 minutes.

11. Add in the squash, chickpeas and scallions, and toss to combine.

12. Remove from the heat and spoon onto the platter. Top with additional roasted peanuts, if desired.

Chunky Roasted Peppers and Eggplant

Teaching budgeting/food cost in a high school Culinary Arts program taught *me* many things as well. First and foremost, how to get creative on the spot, modifying lessons to reach each group of students and their particular needs for the day. As any teacher can tell you, the same bunch of helpful students you worked with in the morning, two hours later might not even be willing to make themselves a favorite batch of cookies.

Once I had worked out the lesson I mentioned in this previous post:

https://thefoodpuzzler.com/2016/02/02/adventures-in-teaching-round-one-nutrition-and-food-cost/

I’d have moments when the students embraced the idea that almost any savory dish was allowable (budget-depending of course). They would come up with all sorts of favorite family dishes. One of these is a relish called Ajvar. Ajvar is a Serbian relish* which one of my students associated with some of her favorite family gatherings. Avjar is primarily composed of roasted red peppers, garlic and spices, but eggplant is also often added.

This dish is based on the same ingredients, but instead of making a traditional Ajvar, I diced the ingredients before roasting, and added red onion, tomato and Poblano peppers.

How I have used this (when my Mom doesn’t eat half the batch with a spoon before it’s done cooling 😉):

~Tossed with cooked quinoa, rice, or small pasta like orzo and orecchiette.
~As a topping for cooked chicken, eggs, or tuna.
~As a base for flatbread or pizza, or on top of French bread slices.

But very often, I just follow Mom’s lead and grab a spoon…Enjoy!

~~~~~~~~~~~~~~~~~~~~~~~~~~~~~~~
Chunky Roasted Peppers and Eggplant
Copyright 2016 by Lauren Bradford
(aka The Food Puzzler)
~~~~~~~~~~~~~~~~~~~~~~~~~~~~~~~

Prep time: 10 minutes
Cook time: 20-25 minutes
Makes: 5 cups

~~~~~~~~~~~~
INGREDIENTS:
~~~~~~~~~~~~

1 large eggplant
2 Roma tomatoes
1 red pepper
2 Poblano peppers
1 large red onion
2 tbsp Olive oil
1 tablespoon Garlic powder
1 teaspoon Salt
1 teaspoon Dried Basil
1/2 teaspoon Red pepper flakes
1/2 teaspoon Black Pepper

~~~~~~
STEPS:
~~~~~~

1. Dice all vegetables into small and even pieces, keeping the peels on but removing seeds and stems.

2. Toss in olive oil and spices, and place on a parchment-lined* sheet pan.

3. Roast at 350 degrees until softened and lightly charred, about 25 minutes. About halfway through the cook time, remove the sheet pan carefully (let the wall of steam escape before reaching in) and stir the vegetables around once.

4. After the vegetables have finished cooking, remove carefully (there’ll still be steam) and let cool slightly before serving (if serving warm) or cool completely.

~~~~~~
NOTES:
~~~~~~

* http://www.npr.org/templates/story/story.php?storyId=6430271&sc=emaf

* The parchment is optional, it just makes for easier cleaning and food release.

Store leftovers in an airtight container in the fridge for up to one week (if they last that long). You can freeze portions, but once thawed it should be puréed to improve the texture and look of the veggies, and warmed to release some of the excess water you’ll get from the freezing/thawing process.

Berry-Brie Apple Quaesadillas

While I was cooking away yesterday, my Mom asked me if I could make us one of her favorite treats. This Quaesadilla is a lovely combination of sweet and savory, with the tart apple, berries and creamy cheese. They make a terrific breakfast or light lunch. Add a little chocolate and it makes a delicious dessert!

You can use pretty much any type of tortilla, baking apple, cheese and berries. I’ve used just about any and all berries, cheddar, even sautéed onions when I had them available. In this one, I use a flax-oat wrap, Brie, Granny Smith apple, and a combination of sweet red raspberries and warmed cranberries.

~~~~~~~~~~~~~~
Berry-Apple Brie Quaesadillas
Copyright 2016 by Lauren Bradford (aka The Food Puzzler)
~~~~~~~~~~~~~~
Prep time: 5 minutes
Cook time: 10-15 minutes
Makes: 4

~~~~~~~~~~~~
INGREDIENTS:
~~~~~~~~~~~~

8 medium-size tortillas

1 Granny Smith apple, sliced thin

1/4 cup red raspberries

1/4 cup cranberries, warmed in microwave in covered dish until softened

1 wedge Brie, sliced thin (mold on or off is OK)

~~~~~~
STEPS:
~~~~~~

1. Preheat your oven to 350 degrees and line two sheet pans with parchment. Alternatively, lightly coat a frying pan with olive oil.

2. Tortilla assembly: distribute the ingredients equally among four of the tortillas, then top with the other four tortillas.

3. Bake for 10 minutes until the cheese is melty.  Or, if pan frying, cook on medium heat for 2 minutes each side.

4. Cut into quarters and serve immediately.

Enjoy!

Cranberry Apple Cauldrons

I just love the combination of apples, cranberries and cinnamon, all warm and toasty. The baking process mellows the tart cranberries and brings a perfect pick-me-up to the cinnamony warm apple.

It’s like having an apple pie without any of the work! For each baking apple* of choice, slice the top 1/4 inch and remove the stem but reserve the top. Scoop out all but 1/4 inch around and at the bottom of the apple. (I snacked on what I scooped out at the time, but it would work easily slipped in an overnight oats dish.)

Add 8-10 cranberries to each apple, place the apple top back on. I happened to have cinnamon sticks and star anise on hand, so I added a star anise to each apple and placed a cinnamon stick through each top and into the apple. Sprinkling 1/8 teaspoon of either ground cinnamon, apple/pumpkin pie spice or a Chai blend, on the cranberries before placing the tops back on, would all work nicely too!

Place in a parchment-lined baking dish, lightly cover the top with parchment as well, and bake at 350 degrees until the apples soften, about 45 minutes.

Serve as-is, top with ice cream or yogurt of choice, or toasted nuts.

Enjoy!

*http://www.thekitchn.com/the-best-apples-for-cooking-ingredient-intelligence-208455